Installation
The Agent is a core component of Cogniteam’s Cloud Platform that enables you to manage and interact with your robot from anywhere. By installing the Agent, you can connect your robot to Cogniteam’s cloud services, handle system software and dependency installations, manage robot configurations, collect platform data, monitor robot status, and remotely control your robot through the Cogniteam Cloud Platform.
You can install the Agent directly on our supported platforms or use a Dockerized version.
Cloud installation
Native Agent Installation
- Open a terminal connected to your robot.
- Copy and paste the installation command for the Agent as provided in the Cogniteam Cloud Platform.
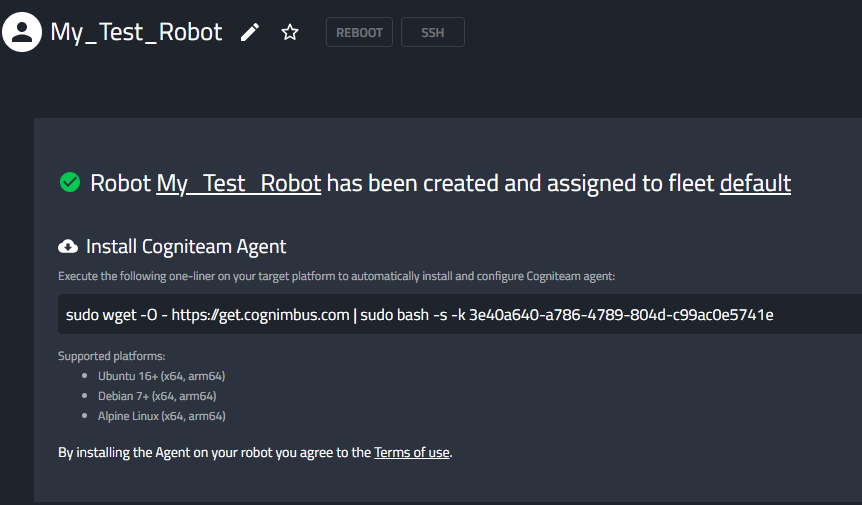
Prerequisites: Ensure that your robot runs on one of the following supported platforms:
- Ubuntu 18+ (x64, arm64)
- Debian 7+ (x64, arm64)
- Alpine Linux (x64, arm64)
Dockerized Version - Experimental

If you prefer using a Docker container, you can append -docker to the installation command. This Dockerized Agent includes all required dependencies within a single image. Use the following terminal commands to manage the container.
- Note: You will neest to start the agent manually by running /bin/nimbusd
- Note: Updates for the Dockerized Agent can only be performed through the provided terminal commands. Updating via the Cloud Platform is not currently supported.
Installation on Windows 11 (using WSL2) - Experimental
You can also install the Agent on Windows 11 by leveraging the Windows Subsystem for Linux (WSL2). This allows you to run a Linux environment directly on your Windows machine without setting up a full virtual machine or dual-boot system.
- Install WSL2
From an Administrator PowerShell prompt, run:wsl --install``` - Configure DNS for WSL
Execute the following commands in your WSL terminal:
echo -e "[network]\ngenerateResolvConf = false" | sudo tee -a /etc/wsl.conf
# add google DNS or replace 8.8.8.8 with a DNS provider of your choice
sudo sed -i 's/nameserver [0-9]\+\.[0-9]\+\.[0-9]\+\.[0-9]\+/nameserver 8.8.8.8/' /etc/resolv.conf - Install Docker Client
Make sure Docker is installed and accessible from within WSL2 by running:
docker - Run the Agent Installation Command Finally, execute the installation command with the -docker option in your WSL2 environment.
Congratulations! You have successfully installed the Cogniteam Agent, enabling seamless connectivity and remote control of your robot through the Cogniteam Cloud Platform.
Offline Installation
This guide walks you through manually downloading and installing the Nimbus x64 binary for the production environment.
Prerequisites
- Linux system with root access
wgetandtarutilities installed
1. Download the Binary
Download the x64 production binary:
wget https://objectstorage.eu-frankfurt-1.oraclecloud.com/n/fr1gfcijhydg/b/agent-prod/o/nimbus_linux_x64.tar.xz -O nimbus.tar.xz
2. Extract the Archive
Extract the downloaded archive:
tar -xvf nimbus.tar.xz
3. Create Required Directories
Set up the necessary directory structure:
sudo mkdir -p /usr/bin/
sudo mkdir -p /etc/nimbus/
sudo mkdir -p /var/tmp/.net/
sudo chmod 777 /var/tmp/.net/
sudo mkdir -p /etc/bash_completion.d
4. Install Files
Move the extracted files to their proper locations:
sudo mv nimbus /usr/bin/nimbus
sudo mv nimbusd /usr/bin/nimbusd
sudo mv tty-share /usr/bin/tty-share
sudo chmod +x /usr/bin/tty-share
sudo mv nimbus-icon.png /etc/nimbus/ 2>/dev/null || true
sudo mv Lato-Regular.ttf /etc/nimbus/ 2>/dev/null || true
sudo mv OFL.txt /etc/nimbus/ 2>/dev/null || true
sudo mv *.so /usr/bin/ 2>/dev/null || true
sudo cp nimbus_auto_completion.sh /etc/bash_completion.d/
5. Create Configuration File
Create the Nimbus configuration file. Replace YOUR_API_KEY with your actual API key:
sudo tee /etc/nimbus/nimbus.json > /dev/null << EOF
{
  "\$schema": "https://agent.cognimbus.com/nimbus_config_scehma.json",
  "server": "https://api.cognimbus.com",
  "apiKey": "YOUR_API_KEY",
  "agentInfo": {
    "sshId": "-",
    "sshPassword": "-"
  }
}
EOF
Set proper permissions on the config file:
sudo chown root:root /etc/nimbus/nimbus.json
sudo chmod 600 /etc/nimbus/nimbus.json
6. Create System Service
Create the systemd service file:
sudo tee /etc/systemd/system/nimbus.service > /dev/null << EOF
[Unit]
Requires=network.target
Description=Nimbus client service

[Service]
Type=simple
ExecStart=/usr/bin/nimbusd
KillSignal=SIGINT
KillMode=mixed
TimeoutStopSec=30
User=root
Restart=on-failure
RestartSec=5s
EnvironmentFile=/etc/environment

[Install]
WantedBy=multi-user.target
EOF
7. Start the Service
Enable and start the Nimbus service:
sudo systemctl daemon-reload
sudo systemctl enable nimbus.service
sudo systemctl start nimbus.service
8. Verify Installation
Check that the service is running:
sudo systemctl status nimbus.service
9. Clean Up
Remove the downloaded archive:
rm nimbus.tar.xz
Troubleshooting
| Issue | Solution |
|---|---|
| Service won't start | Check systemd file syntax and permissions |
| Can't access local agent | Verify correct IP from ifconfig |
| File permission warnings | Use sudo chmod 600 /etc/nimbus/nimbus.json |
What’s next
- Keep the agent current by running
nimbus system agent-upgradeor following the Upgrade guide when new versions arrive. - Capture the device state with
nimbus system agent-backup <name>before applying risky configuration changes or upgrades; read the Backup page for retention controls. - If an upgrade misbehaves, follow the Restore (Rollback) instructions to revert to a known-good snapshot without reinstalling anything.